May 21, 2014

Sunning Cloth Diapers

My cloth diapers have taken a beating the past week (I'll leave that to your imagination) :) 

They were totally stained!  Because it is finally getting nice and sunny in our neck of the woods, I decided to try "sunning" my diapers.

It is so easy and it WORKED!!!

All I did was wash my diapers like normal, but then instead of throwing them in the dryer, I put them on my laundry rack to dry in the sun.


The sun basically acts as a natural bleach and it takes the stains out.


Once the diapers were dry, I did toss them in the dryer for a few minutes because they were all crunchy from drying in the sun.  But just a few minutes was all they needed  and they were soft and fluffy!

I most likely won't do this very often, just when my diapers are needing a good whitening.  I always am waiting until the last minute to wash diapers, and I don't see that changing in the future.  I don't have time to let diapers dry outside all day long.  But I do love the energy saving of not using the dryer, so we'll just have to see how it goes! :)

Happy Cloth Diapering!
Cassandra :)

May 20, 2014

Crying It Out...

This past week I did something I thought I would NEVER do.  I let my little Love Bug cry it out to go back to sleep.  I was VERY sure I would never do this, but two things made it very apparent that I needed to do this...

1.  Bug was waking up every 45 minutes to an hour and just wanted to be cuddled back to sleep.  If I did try to nurse him, he would eat for about 30 seconds and fall asleep.  

2.  I was having a conversation with my aunt about Bug's sleeping habits and I started crying... a lot and unstoppable because I was SO exhausted and knew something needed to change!

So I guess the main reason why I never thought I could do cry it out was because I am a nurturer, I like to meet people's needs, especially my little Bugs and it hurts my heart so bad to hear him cry.  But like I said above, something needed to change. 

To make a long story short, I will give you the time line of events that brought this to be...

**April 4th - we started Bug on probiotics and he was sleeping for about 3 to 5 hours at a time at night.  GREAT!  I could handle that!
**April 15th - Bug gets his 6 month shots and a few days later catches Daddy's cold because of his weakened immune system.  
**The next few days are awful!  The first cold for my Bug was so hard on me because I couldn't help him!
**He is sick for a while... around a week and a half.
**He's better by the last few days of April, but his sleeping is HORRIBLE because I spoiled him while he was sick.  I knew I had to do something, but we were leaving for Arizona in a few days, and I knew things would be different and habits would change, so I just suffered through it.

We get to Arizona and his sleeping is obviously still awful!  This is where the conversation with my aunt happened and let me tell you it was HARD to hear!

I was DEAD set against crying it out, but I guess it's because I didn't know what would happen.  I just imagined my baby crying and crying and thinking his mommy didn't love him anymore.  

But she told me exactly what happened with her baby 14 years ago.  She said her baby was very much like Bug in personality and habits and she finally had to do something. 
Here is what happened at our house with crying it out...

Night one - I nursed and put Bug to be like usual around 9:30.  He nursed a long time, and I knew he should not be eating before 2 AM.  In my mind I knew he would not starve to death waiting 4 and a half hours to eat.  I needed to have that goal in my head, because I think it would have been harder for me to let him cry when he woke up around midnight. When he woke up, Bug cried for 47 minutes, he stopped for about 5, and then cried for about 10 more.  He fell asleep and slept from 1 to 7:30 the next morning.

I will say the only reason I was able to let him cry as long as I did was because my husband is AMAZING and kept reassuring me it would all be okay.  He basically had to hold me down in bed.  Not forcefully, but he had his arms snuggled around me. 

Night two - I nursed Bug to bed at about 9, he woke up at 10:30 and cried for 25 minutes, and slept until 7 the next morning.

Night three - I nursed Bug to bed at around 9:30.  He woke up and cried for about 5 minutes at around 1 AM and slept until 5.  I nursed him at 5 and he slept til 8.

Night four - No crying!  He slept from 9:30 - 6, nursed and slept until 8:30.

My baby Bug still loves me, even more than ever because he isn't so tired and crabby all the time! :)

We have been going on about a week, and some nights he will whimper for a couple minutes, but he goes right back to sleep.  I have been getting up between 4 and 6 to nurse him, and he will sleep for a few more hours.  But that is manageable!

His naps are also much better.  He has been taking one and a half to three hour naps two to three times a day.  So, so, so, so nice!

My main reason is writing this blog isn't to boast at what we did, but it is to help someone who was in my position.  I was exhausted and didn't know what else to do.  I was beside myself with terror and what would happen if I let my \precious Bug cry himself to sleep.  

I NEEDED someone to outline exactly what was going to happen.  My aunt told me down to the minute what happened with her baby.  And it really helped me to know what to expect. I would not have lasted as long as I did the first night if she would not have told me it took an hour and five minutes for the first night.  

It is okay to let your baby cry.  It will make your baby happier which in turn will make you happier!

That's all for now! 
Cassandra :)

May 14, 2014

Mesh Feeding Baby Bags... A Teething Solution

My little love Bug is TEETHING!!! His first tooth just poked through a few days ago, and life has been pretty miserable for him lately :(  I feel so bad for him.  But I just wanted to share some things that have been helping us get through the pain.


The first, and most amazing thing, is our mesh feeding bags.  THEY ARE A LIFE SAVER!! :)  The week before the tooth broke through, Bug could not get enough of cold, juicy watermelon and honeydew in his feeding bag.  He would chew and gnaw until there wasn't any fruit left.  

Once his tooth broke through, he really hasn't been interested in food AT ALL, but I have been putting ice cubes in the bag and he really enjoys that! 

These are the type of bags we have, and I love them!  For the most part, they are very easy to clean (except banana... I have been tempted to throw them out after putting bananas in them, but I just let them soak overnight and it seems to help).  But they have really been a great help to soothe teething pain!  And we also love them for when Bug just needs a snack and isn't in the mood for baby food.


The second thing that has helped is teething tablets.  I know that people have all different types of reactions to teething tablets because they are a natural medicine and not FDA approved.  But in my opinion, I would rather use a natural pain reliever than a medicine full of crazy ingredients. But that's just me.  
The tablets just melt in Bug's mouth in a few seconds.  I hold it under his tongue until they dissolve, and then I rub the powder on his gums.  They really do seem to give relief to his hurting mouth!


Frozen teething rings are also a huge relief.  Obviously, just throw these in the freezer and then let your baby bite and suck!  Simple :)


A warm bath has also helped us.  I know it may sound funny, but baths TOTALLY make my Bug chill out.  So if he is really fussy and nothing else is helping, I put him in the bath and it instantly relaxes him and once he is relaxed, his pain in more manageable.  


This tooth has been quite the upset for my Bug.  And to be quite honest, it is breaking my heart to see him in so much pain.  But these tips have helped make the pain much more bearable (for both of us)  :)

That's all for now!
-Cassandra

May 12, 2014

Naptime Creations

So I have been absentee from the blog for a bit again...  and I really don't like it! :(

But while I have been gone, I have really gotten into crafting.  I have started my own "business" of sorts.  It is called Naptime Creations and I have a page on Facebook.

Check out the page at www.facebook.com/naptimecreationsbycassandra

If you ever want anything made, let me know! I would be more than happy to create something off the page, or something special you had in mind.

Check back soon for more posts about things I am trying out in our little world.

Thanks for visiting!

Cassandra :)

February 27, 2014

Cloth Diaper Fleece Liners

When I first started cloth diapers on my Bug, he hated the feeling of being wet.  Which I don't blame him for!!  So I changed him alot.  Which wasn't too bad, but then I had an idea...

I also was looking for something to act as a barrier for when I put on diaper cream, because I did not want to buy special cream for cloth diapers.  

I was reading a blog somewhere that said to cut little pieces of fleece and put them down so the diaper cream goes on that and not the cloth diaper. 

So I tried that and when I used diaper cream, it worked okay.  But the pieces were too small. (These have now become my wipes).

So I decided to buy more fleece and cut them to the size of a tri-folded prefold.


I have since discovered that if I always put a fleece line down it does two things...

1.  It wicks away the moisture from my little Bug's bum, helping him to feel more dry.
2.  Saves my diapers from getting super stained when he poops! :)  The sides get a little stained, which comes out after a few washed, but the whole thing stays fairly clean for the most part. 

I do only use these with prefolds because most other diapers on the market already have a wicking away liner.  


The coolest thing is that when I was looking for doublers and inserts online, I ran across fleece liners.  They are doing the same thing I am using them for.  But in my opinion, they are super spendy!  So I am feeling pretty good about myself for coming up with the idea on my own, and it is really a "real thing" for cloth diapers!  (Pat myself on the back! :) )

I bought one yard of fleece for about $6.00.  I didn't wait for a super great sale because I wanted it NOW! So it wasn't the cheapest, but I probably made about 60 liners or so.  So I still think I came out quite nice with the price.  

The fleece really does wash up nice to.  I haven't had any stains or anything and for the most part, it is still very soft and thick feeling.  

I will advise you to buy the fleece from a "good" fabric store like Jo-Anns or someting.  The first stuff I bought from Wal-Mart because Bug was super tiny and needed to eat alot, so when I was out and about, I couldn't be gone for that long.  So I got it at the one stop shop of Wal-Mart.  The fleece is thin, VERY stretchy and poor quality.  I am using this for my wipes, but I am very glad I got some better quality stuff for my liners!  

Ahhh... I just LOVE talking about all the great things about cloth diapering!  It is so much fun!

That's all for now!
Cassandra :)

February 26, 2014

Baby Food... Yum! Yum! YUM!!

My little Bug is 4 1/2 months old and he is so ready to eat some solid food! 

We have been trying rice cereal and oatmeal cereal for about 2 weeks now, and he LOVES it!  But I feel it is making him a little constipated... sorry for the TMI! So we are trying out some veggies starting this week.  My husband gave Bug a taste of the green beans while we were making it and he looked at him like "Dad, you're such a tease! Give me more of that!!!" :)

I decided to make all my own baby food purees.  When I first started looking into making baby food, the word "puree" scared me because it sounded so fancy!  (Insert slightly embarressed face here!)  But then I learned that it just means really really blended up baby food.  Just like the kind you would get in the store.


It is so much cheaper to make your own food and it is SO easy!  I made all the food listed below in about three hours give or take.  (Two hours for the veggies one day and one hour for the fruit the next.)

Hope you and your baby enjoy these veggies and fruits.

Green Beans
16 ounce bag of frozen green beans

Steam for about 20 to 25 minutes.  I got a new cookware set that has a steam basket with one of the pots, so I just used that.  It worked out really nice.  The water was green, but I feel like so much more of the nutrients stayed with the food by using the steamer and not just boiling them.  

Blend them in the blender until very smooth.  Add the water you used to steam as necessary.  My blender needs it really "sloshy" so I probably used about a cup to a cup and a half when making it.  But start out slowly adding water to avoid making it too runny!  


**I tried to use my food processor first, and I liked that you didn't have to add so much water (because I wanted to add breast milk to the food when I fed the Bug)  but it really didn't get it nearly as smooth and creamy as the blender. I think the food processor will be good for second and third foods when they don't have to be so smooth and the baby can handle some texture.  

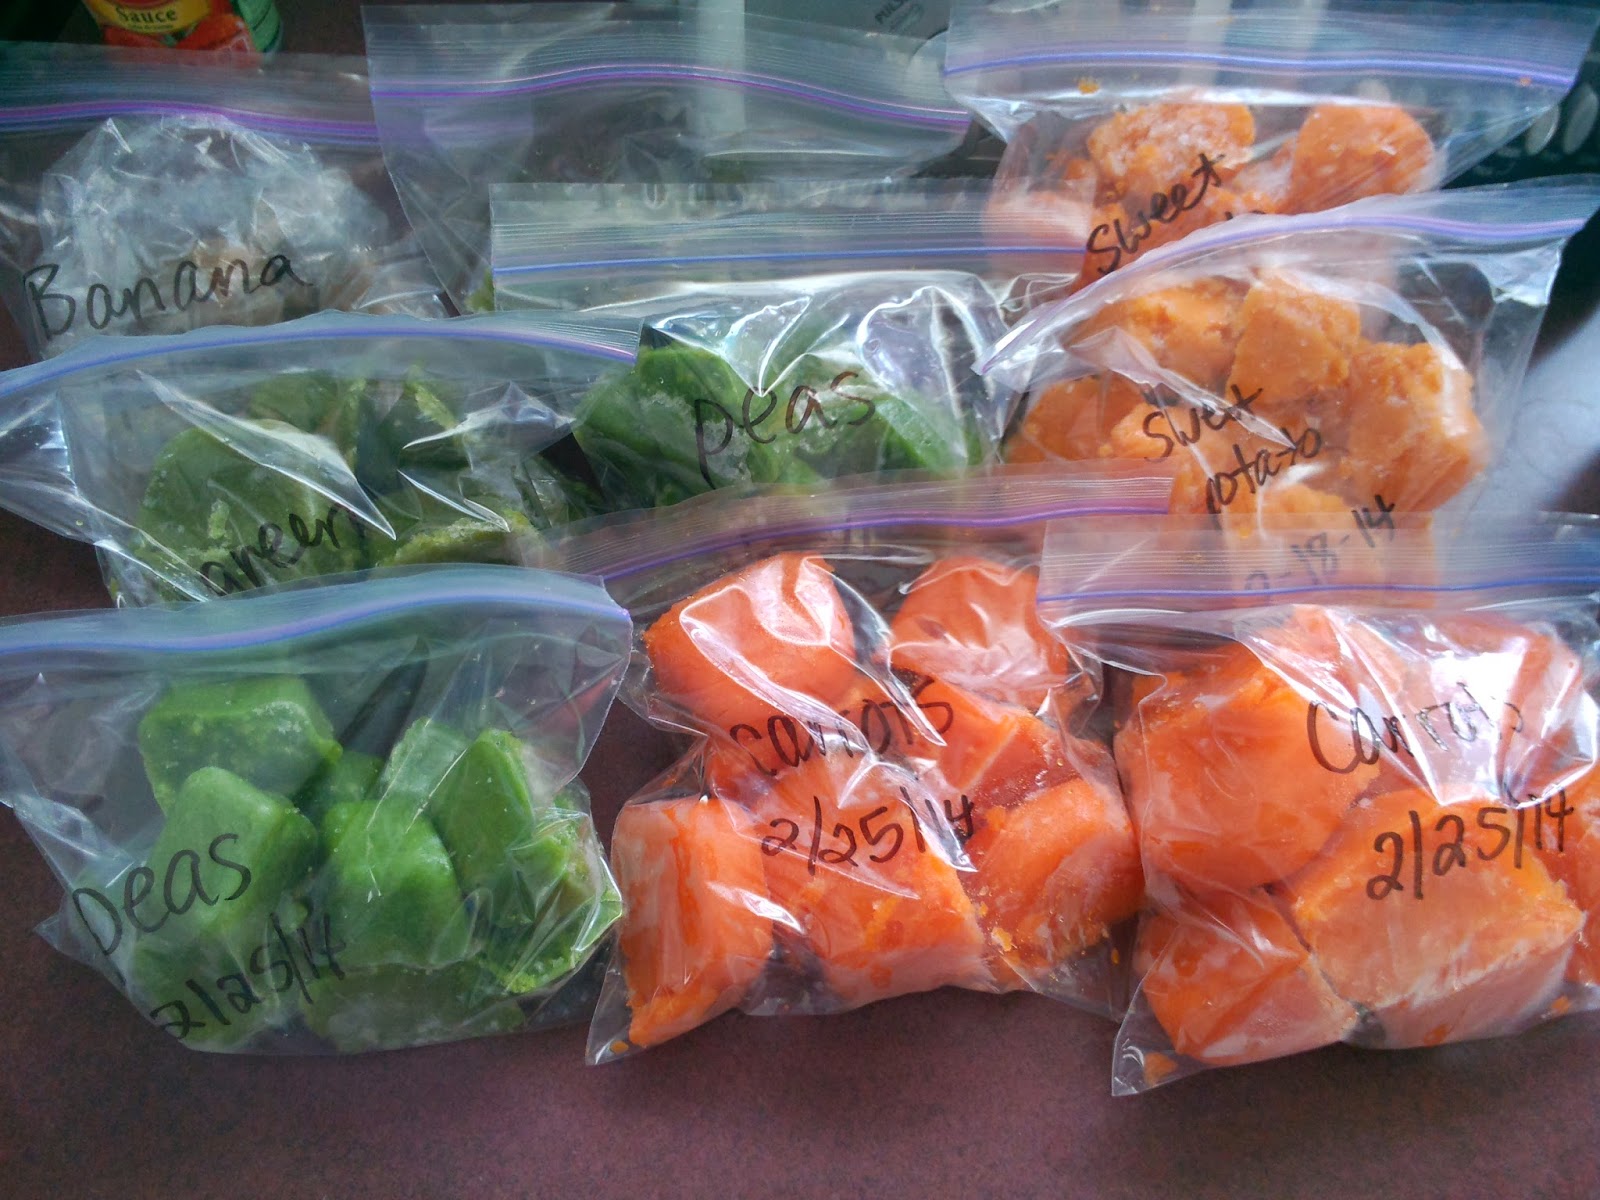
Pour or scoop the green beans into ice cube trays and cover with saran wrap and freeze overnight or for about four hours.  Once frozen, crack the trays and put in a ziplock bag and label with contents and date. 

Sweet Potatoes
2 large sweet potatoes - the orange kind (some call these yams)

I simply poked holes in them with a fork and then I put these on a piece of aluminum foil to avoid them dripping in the oven.  I baked them for about an hour or so. 

Once they are nice and soft, you can do one of two things.  Blend them with a little water, or just mash them with a fork.  

Once again, I feel like blending is good for first foods, and the mashing for later stage baby food.  If you do mash with a fork, you might want to cook them a little longer to get the sweet potatoes good and soft.   

Pour or scoop the sweet potato into ice cube trays and cover with saran wrap and freeze overnight or for about four hours.  Once frozen, crack the trays and put in a ziplock bag and label with contents and date. 

Peas
16 ounce bag of peas

Steam for about 20 to 25 minutes.


Blend them in the blender until very smooth.  Add the water you used to steam as necessary. I used about a cup of water for the peas. 


Pour or scoop the peas into ice cube trays and cover with saran wrap and freeze overnight or for about four hours.  Once frozen, crack the trays and put in a ziplock bag and label with contents and date. 

Carrots
2 pounds of "real" carrots, not baby ones

Peal and cut the carrots into about two to three inch pieces.  Steam for about 45-50 minutes.  Depending how big or small your pieces are will depend on your cook time, but you want them to be very soft.


Blend them in the blender until very smooth.  Add the water you used to steam as necessary. I used about a half cup of water for the carrots. 

Pour or scoop the carrots into ice cube trays and cover with saran wrap and freeze overnight or for about four hours.  Once frozen, crack the trays and put in a ziplock bag and label with contents and date. 

Apples
5 pounds of Braeburn apples - I used these because they are nice and sweet and not tart, but any kind would work.

Peel, core and quarter the apples.  Place into your pot and let them steam for about an hour.  You can add about a cup of water, but as the apples cook, they will get liquid-y. 

Once they are soft, scoop them into the blender and puree.  You should not need to add any extra water, but if you do, that's fine too!

Pour or scoop the apples into ice cube trays and cover with saran wrap and freeze overnight or for about four hours.  Once frozen, crack the trays and put in a ziplock bag and label with contents and date. 

** I made a first batch of apple sauce with just putting the whole apple in the pot.  That's what I generally do when I make apple sauce.  But I usually use a food mill, and that really mashes everything up.  When I put it in a blender using the whole apple, it did not blend up the seeds and the core stuff really well.  So needless to say, the first batch can not be used for baby.  But adults could eat it.  Just a bit of insight so you don't make the same mistake as me! :)

Pears
2 pounds of fresh pears and two cans of pears in light syrup.

Peel, core and quarter the pears.  Place into your pot and let them steam for about an hour.  You can add about a cup of water, but as the pears cook, they will get liquid-y.  I cooked the fresh and canned pears separately.  Mainly because I wanted to see if they were different.  The were not different tasting, just different in color a little bit. They could be done together if you wanted to. 

Once they are soft, scoop them into the blender and puree.  You should not need to add any extra water, but if you do, that's fine too!

Pour or scoop the pears into ice cube trays and cover with saran wrap and freeze overnight or for about four hours.  Once frozen, crack the trays and put in a ziplock bag and label with contents and date. 

Bananas 
**I made bananas buy mashing them with a fork and then freezing them like the rest of the food, but when I un-thawed them, they tasted rotten.  Not sure if that was a freak thing, because I know others who freeze them, but I just make them fresh each time because they can very easily be mashed up with a fork!

I had so much fun making the baby food!  And it really was so simple!  I also love knowing that my little Love Bug is not eating fresh food that his mommy made for him with love! :)


Here is a breakdown of prices...

Green beans - $1.00 - made 15 one ounce cubes
Peas - $1.00 - made 18 one ounce cubes
Carrots - $1.69 - made 22 one ounce cubes
Sweet Potatoes - $2.12 - made 27 one ounce cubes 

Apples - $4.40 - made around 50 cubes!
Fresh pears - $2.24 - made 18 cubes
Canned pears -  $0.96 - made 18 cubes 

So as you can see, a huge money saver too! Most baby food is about one dollar per can/container.  And let's say you  baby makes two meals out of one container, that's 50 cents a meal.  This is crazy cheap when comparing!

Hope you enjoy making your baby food as much as me!  I just can't wait to start mixing flavors! :)

Have fun!

Cassandra :) 

February 20, 2014

Cloth Diaper Washing Routine and Detergent

One of the big choices when using cloth diapers is how to wash them.  This can be a little daunting at first, because I mean, come on... you are washing poop... in your washing machine... that washed all your other clothes!  Kind of gross! :)

But I promise, it is not that gross.  And it really isn't all that hard either!  

Like said in my cloth diaper 101 post, I am not saying this is the greatest way to wash cloth diapers... this is just what works for our family.

We use a wet/dry pail method.  This means that some diapers get put in the pail wet and some get put in dry.  We use a garbage can from Target with a press down latching lid.  I use lemon scented garbage bags to line the pail. I know, I know! Bad mommy for using bags and not a reuseable liner.  But honestly I am using cloth diapers for the money saving aspect, not the environmental aspect and in the long run, I think using disposable bags will be cheaper than buying diaper pail liners.  Diaper pail liners are anywhere from 18 to 30 dollars each and I would need to get two of them so you can use one while the other is washing.  I bought 75 garbage bags for less than 4 dollars and I use one every two to three days.  So about 8 - 10 dollars per year and hopefully diapers for only two years... you do the math! :)

But back to the wet/dry pail!  We have the pail in our bathroom next to the toilet.  We change Bug's diaper in his room, and then bring the diaper to the bathroom.  If it is just a wet diaper, we simple put it in the pail.  If it is a messy diaper, I either spray it off with the diaper sprayer, or rinse it in the sink.  If it is really runny and gross like breastfed baby poop can be sometimes, I just rinse it in the sink because I would fill my toilet up three times using the diaper sprayer because the poop just stays on the diaper and you have to use so much spray to get it off.  I leave these messy diapers pretty wet when I put them in the pail, trying to leave as much water as I can in them to leave them wet until wash day.  This helps the stains to not set in.  

My husband made this wonderful diaper sprayer but you can buy them online also.

I also take all the diapers inserts out right way so I don't have to do it before I put them in the washer.  Digging through diapers that have been sitting for two days does gross me out! :) So I always make sure to have everything wash ready before putting it in the pail!

On wash day I bring the bag down stairs and and put it in the washing machine.  I also throw in a towel to help swish things around.  I usually end up only filling the washer up half full with diapers, so I just feel like the towel helps to agitate them more.  I use a full load setting of water and do a cold rinse.  Water cleans diapers!  I find it best to put it on a full load regardless of how full of diapers that washer is. 

After the cold rinse, I put in detergent and do a hot wash, cold rinse cycle.  Some people say to do another rinse after this to make sure all the detergent is out, but I really don't find it necessary.  My little Bug doesn't have rashes and my diapers do not repel, so I am pretty sure all the detergent is out. But if you have either of these problems, you might want to do another rinse. 

Then I throw everything in the dryer.  I use the longest dry cycle on the hottest setting.  My fitted and hemp liners don't get dry all the way so then I just set them out to finish drying.  I know some people say to pull out the covers because heat isn't good for them, but so far I am not seeing any problems with the covers.  They still look and work good as new.  So for simplicity sake, I will continue to put them in the dryer.

The detergent I use to homemade, but it's nothing fancy.  I just decided to use it once again because of the money saving factor.  Buying cloth diaper detergent is expensive!  And I didn't want to just use regular detergent because I know that can cause repelling issues.  So I made my own. 


Here is my recipe...

1 cup Washing Soda
1 Cup Borax
1/2 cup Oxi-clean free or baby

Simply stir them together and you have a cloth diaper detergent!  Easy-peasy lemon-squeezy! :)


I tripled the recipe and it lasted me 3 1/2 months.  I use about 2-3 tablespoons per load.  


I wrote the recipe on a piece of paper and taped it to the top of my container so I always have to ready to go and easy access to it.


I do still have some staining, but nothing too bad.  And usually a few washed will get the stain out totally!  Once summer comes, I am going to try sunning my diapers because I have read that takes stains out.  But for now, it is winter in North Dakota, so no sunning diapers for me! :)  

 I hope you are enjoying the wonderful world of cloth diapering as much as I am!  
Cassandra :)

P.S. - I know there is some controversy over using borax.  But it is only dangerous if it is ingested by a child.  Well two things...
1.  All the detergent is washed out of the diapers
2.  My Bug is not sucking on his diapers!
So for me, it really isn't a concern, but if it does bother you, there are many other simple recipes for cloth diaper detergent you can use.